Monday, December 5, 2011

Zentangle Advent Calendar

[Picture heavy post!]

Wow! Can't believe December 1st has already come and gone! I still feel like it is September. I can't keep up with time.

One of my cherished memories from childhood is an advent calendar someone had sent us as a card. I just loved the illustrations on it and each year would revel in opening the tiny door to see what was underneath. No one else participated with me, but I didn't care. I loved it! That poor thing was worn out as I carefully shut the doors each year and put it away for the next year.

I had hoped to do some kind of fabulous calligraphic advent calendar at some point in my life. I just never found the time. * However, this past June our guild challenged each of its members to calligraph a cylinder to be displayed at our December meeting where we typically showcase our calligraphic work from throughout the year. Being given a blank canvas and an assignment with a deadline is probably one of the worst creativity stiflers I can imagine. I stared at that cylinder for five and a half months!

Then I sat down just before December to write this blog. I got to the point where the * is and the idea hit me! I could make the cylinder into an advent calendar! And that is exactly what I did! This project took 32 hours. But I am very happy with the result. And it is a nice way to display some of my greeting card work.

I started by mapping out the spacing for the envelopes to determine which size tags to make. Once that was done, I made the envelopes from left over Stardream pearl envelopes from an old calligraphy job. I knew I would use those some day! They had a return address printed on them but the front was blank. I used Joanne Fink's zenspirations to create the numbers.

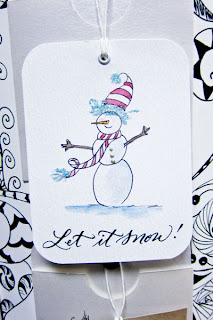
Once that was complete, I zentangled the entire sheet - 21"x31" sheet of hotpress Arches watercolor paper. This was the exact size needed to cover the cylinder. I then glued on the envelopes and started on the tags. Many of the tags use designs I created for greeting cards over the years but some were designed solely for the calendar.

Now that it is complete, I would only do one thing differently. I would have left a white space around the squares where the envelopes were. I loved the zentangles but once the envelopes were added, it detracted from the zentangle which really became just a background pattern. I think with some white space around the envelopes, the zentangle would still really stand out.

I am thinking of doing another one for the future but as a flat canvas. Instead of envelopes, I would cut a slice for each tag and tape an envelope behind the canvas.

Hope you enjoy!
Erica


Tuesday, November 15, 2011

Monday Morning Pinch Me - New Minivan!

I've needed a new minivan for awhile now. My old one was 8 years old and had 120,000 miles on it. With three kids that translates to about 300,000 miles! Practical as we are, we wanted to wait until we found just the right one. Well, this weekend we did! Not only did we find a great minivan (Kia Sedona) but we found an amazing dealership.

We went to Fuccillo Kia in Cape Coral Florida. We were amazed at their fabulous customer service. Our salesman was a 7 year police officer turned salesman and he was fantastic. He even gave us some great parenting tips! The owner even sat with us and helped us get a better interest rate. To top it off, he gave us a gift certificate to a local restaurant (seafood!) because we had been there all day and hadn't eaten anything.

Buying a car has never been a fun experience -- until now. So, I thought it appropriate to send a nice thank you note. I had mentioned I designed greeting cards and the owner said he had never heard that before so I decided to design a fun card especially for them.

In doing so, I thought it would be interesting to show you all how the design process works for me. This is the pencil sketch I worked out beforehand.

From there, I create the design with a pointed pen. This takes a lot of time as I go over and over the design until I get each part just right.
From there, I created the final design for the card.


On the final card, I filled in the heart with a glitter pen and the card was printed on pearl paper.

Love my new minivan and we heart Fuccillo Kia!
Truly,
Erica

Monday, November 7, 2011

Monday Morning Recap - Whatcha been up to?

WARNING: Very photo heavy post!

I just finished next year's birthday card for the Coastal Calligraphers Guild. LOVE it! I can't share until next year because I want it to be a surprise for members. Tease right?! Anyway, I've been doing lots of crafty stuff and baking but not much calligraphy these days. I thought I would take a moment to recap what I've been doing to make up for the lack of calligraphy. Sorry lettering friends - hope you enjoy some other stuff, too!

I made this little ipod hoodie for my oldest. It took much longer than I expected but I love how it came out. Found the pattern on Ravelry but originally it came from Colorado Moms. Thanks for sharing such a cute pattern! Wonderful gift for the teen in your life.

My cousin recently had another baby girl. I made this sweater dress for her. I'm not usually a clothing knitter but more of an accessory knitter. This took some work but I was really pleased with the result.

Let's see ... what else. . . last Christmas I did a few house portraits for friends of my parents.


What else? ... A totebag for my aunt and purses for my mom, my other aunt, and two other friends. This bag (except the tote) is my favorite pattern (as you can tell) and they were made from the Zest Tote Bag pattern at Joann.com. Note, I skipped the flower and made the straps longer than the pattern.


Goodness... can you stand another?!


Made these Kids Art Organizer totes for my nieces when they were moving back to Maine. Great for long car trips! This was a great Etsy find - Ginia18 has some wonderful patterns.


I loved these so much, I made one for myself for my calligraphy supplies in zentangle like fabrics!


Made this cute little dog harness for my mom and dad's dog. Found this wonderful free tutorial here at the Moda Bakeshop.

Made 10 of these cute little reversible bags for my oldest's birthday party. We did a treasure hunt at the mall with 10 of her friends. It was REALLY fun! The purse size was originally much larger and the strap was originally smaller but I made it a little longer and the purse a little smaller. This was a free pattern called Grab Bags from allpeoplequilt.com.


I made one for each of the adult chaperones, too!


This one is one of my favorites! I made these for all the cousins and my kids last Christmas. Their Nana passed away and we all live in different states now so I thought this was really cute. This was another awesome free project from joann.com. I made the drawstring bag and added the poem (feel free to borrow).


Made this laptop bag for my mom. I doubt I'll make another one. I loathe working with foam. This was a store bought pattern.

Every year I try to make one gift that I can give to all the folks on my list. You may recall my maple syrup bottles a few years ago. This past year it was conversation starters. I made these from scratch ... it took a lot of work and organization. I wouldn't recommend it! I see now they sell these things in various places. I also made the snowflake ornaments but I will blog about those separately soon.

This was a gift for my parents friends who are also now our friends. Their last name is Parrot. I've tried silk painting a few times. I still need some practice. But this was fun.

Made these for friends of ours that have a little girl and also a set for my uncle's son who recently had his first. I made a little cloth drawstring bag to put them in and crocheted a drawstring bag for the second set. SO CUTE! This was another great etsy find! Barnyard Balls by patternplay on Etsy.


Made quite a few cheer bows for the cheer squad at Imagine School where all my kids attend. These took some work as I had to actually make the sequin ribbon because it doesn't exist anywhere else! I cut fabric strips and used fuse-a-seam to adhere the strips to ribbon. Each bow had to be assembled and stitched. I used instructions from this great ebook, Cheer Bow Instructions from No Bow No Go.


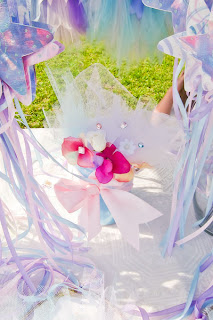
Speaking of cheer... I made over 50 fairy tutus, crowns, and 100 wands for a fundraiser at the school carnival. We were in a bad location so we only sold a handful. If you know anyone that needs fairy gear, I'm your girl!


Speaking of fundraisers... I made hundreds of cake pops and muffins for a bake sale of sorts during a motorcycle run fundraiser. We had a lot of fun but didn't make a lot of money as unfortunately, the turnout was really low. :-( I ate way more of these than any human should. I did make the labels (sort of lettering). The muffins were DELICIOUS and came from Good Housekeeping: The Great Bakesale Cookbook, a book with great ideas for bakesales. I should have left off the Ricotta label because you don't taste it and they are wonderful, moist, lemony muffins. I should know. .. I sold 2 and ate 4. The cheerleaders had no problem finishing the left over cakepops.


This was a birthday gift for my little cousin who is more like a niece. She's a doll! I think she enjoyed playing with these. This was another store bought pattern.


I also made her a princess crown hat for those inbetween cold days when a full hat isn't required. This is a pattern I purchased called Loved by Talitha Kuomi.

I baked quite a bit throughout the year. I won't post all of them. But my favorites were the pumpkin and chocolate whoopie pies. YUM! Oh look ... a tiny bit more calligraphy! :-)


WOW! I'm going to have to stop here even though there are a few more fun things I made this year that I would like to share. Maybe next time. Geez ... looking at all this in one place it's no wonder I don't have any time for extra calligraphy fun! Well, there is always next year. :-)

Truly,
Erica

Monday, October 31, 2011

A Rainy Monday - Halloween!

Had a very busy weekend - making Halloween costumes! It's been a tradition since my first born to make costumes every Halloween. Some years the kids forgo it for a store bought one, others they ask for something really elaborate. Either way, whatever makes them happy. I enjoy doing it. If you remember two years ago, I pulled my first all-nighter in many years whipping up two costumes - one for my oldest and one for her bestie.

Well this year, she turned 14 and I figured it's time for her to stop trick or treating and she insisted she will trick or treat until she dies of old age. I told her if she planned on going she needed a full costume and it's a fact the older you get, and the less costume you wear, the less people want to give you candy. She insisted she had it under control.

So that's why yesterday I ended up making two "costumes" one for her and one for her best friend. They wanted something cute, but not trampy (which it seems is the only thing the local Halloween store carries for teens). They wanted something that was a costume but not really a costume. See, I said - another sign you are getting too old!

In any event, they decided on Tom and Jerry so I searched through my stash (I practically have a craft store in my front closet so it wasn't hard). I found some felt, found two headbands, made a pattern, and came up with these.


They were delighted. And I had fun making them.

My son, now 10, has left behind Spiderman in lieu of more "serious" Halloween wear. Last year he went as a *really* creepy guy from a video game he isn't even allowed to play. This year he asked to go as "Ghost" from Modern Warfare 2. Given it was too late to find a balaclava anywhere locally, I whipped up this little number with a dollar's worth of black stretch fabric and some white acrylic paint.


He was utterly amazed and I was really happy with how it came out.

Finally, my youngest, wanted the full blown deal - Mermaid. I purchased a pattern on sale for $1 and $12 worth of fabric and two days later had this.


Worth every last minute for that smile!


Hope you all have a safe and

Truly,
Erica